Monday

Before and After

I found this lovely little end table at Goodwill and immediately was drawn to it.  It was definitely beat up, but I knew those details would just pop with a little glazing.

So here it is before....


and after a little white paint and black glaze....There's much more of a contrast in real life, these cell phone pictures don't really do it justice...


See my cute little succulent?  (I found that cute little display cloche at Goodwill for $.99)  I think maybe it's one plant that I can't kill.  We shall see....


Sadly, there's no room for it in our house so off to my booth it will go....


This picture I took out in the garage actually shows a more accurate depiction of the color...


Sunday

A little something extra...

You may remember the makeover I did on this dresser.  I really liked it (and still do) but felt it needed something a little extra.  I decided to add a decorative border using some frog tape and some oops paint I had in the garage.

I taped off my design....


Painted over it with the same color that the rest of the dresser is to seal the edges (works every time)


Then, I painted it with some brown paint.  Next, my favorite part, peeling away that tape and seeing a nice clean line.  


and there you have it.  

First, I'll remind you of what it looked like before the decorative border....


and here it is with the new border.  


See that little moose head under the cloche?  He used to look like this...I bought him at Hobby Lobby for 80% off.  Some may think it's weird, but I like him.


Wednesday

Birthday Wish

I've decided what I want for my birthday...

this kitchen....


that's not too much to ask right? ;)  It's the perfect shade of gray paired with the dark butcher block countertops, I love it.  And since butcher block is much cheaper than marble/granite it may just be doable.

image from atlanta homes magazine via abode love

I'm really liking the gray cabinets, as much as I love all the white on white stuff the gray really suits me more....


Friday

Hitting the Nail on the Head

I may have developed a slight addiction to the nailhead trim I used for my dining room table.  I just love it.  It's SO easy to use and about a million times faster than nailing each nailhead down individually.  I purchased this trim from this ebay seller again only this time I chose the french natural finish.  It looks much less shiny and gold in real life than it does on the ebay listing which was good because that's what I wanted.  I just love how quickly it can dazzle up a piece.  I also love the juxtaposition of an old wooden door with chippy paint and some classy nailheads.  I think it keeps it from looking too rustic.

So, what did I do with these nailheads?  I turned an old door that I found on the side of the rood into a desk/table.  I sanded it down to reveal layers of old paint and to get a smooth finish.  Next, I went over the whole thing with a dark stain to bring out the color of the wood and to make the finishes blend better.  It definitely helped.  Then, I went over the whole thing with some glossy polyurethane to seal the deal.


and there you have it....I attached the door to some sawhorses to keep with that industrial chic kind of look.  It would be even better with a glass top to protect it and even out the surface, but glass is expensive so I'm going to leave it as is for now...


and here it is in our booth, the lighting isn't as good in these pictures (really yellow for some reason) but it gives you an idea...the above two are more accurate as far as the color goes...


This would even make an awesome headboard...now my wheels are turning, I do have another one of these in the garage...hmmm.... :)

Thursday

Ruffles

Lately, I love anything frilly or ruffly (is that a real word?).  I think it's because I'm a girly girl.  I love all the ruffle embellishments on clothes and so I thought I would translate that to a chair I had in my garage.  I hate it when I forget to take before pictures, but unfortunately that is the case with this one so you'll just have to use your imagination.

I started out with a basic wooden chair from Goodwill....

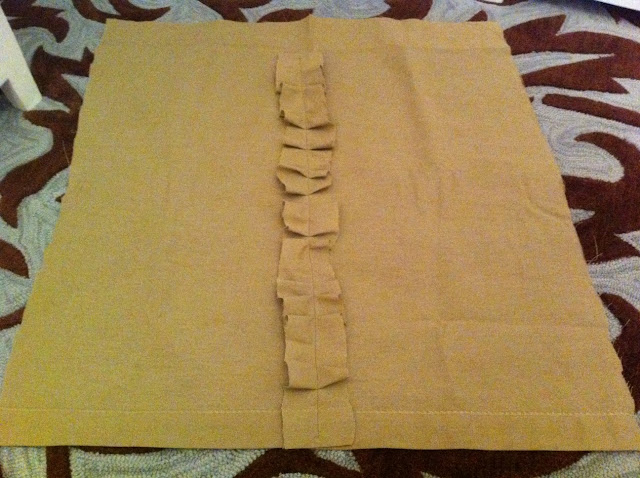
Then I cut a square of fabric large enough to cover the whole cushion.  I used an old curtain panel that I had leftover from college.  It was the perfect color and weight.


Then, I cut strips from the same fabric that were about 1.5 times as long as the square I cut...


Then, I started sewing the strips onto the square.  I didn't want this to be perfect so I didn't pin it, I just scrunched as I went.


add as many ruffles as you want and you should end up with something like this....


Now, just staple it on your cushion and you're done!  I chose to paint the frame of this chair my new favorite Rustoleum color, charcoal green.  It really reads much more gray than green, in fact it doesn't look green at all to me.  I'm not sure if it's a discontinued color (I sure hope not) because I found it at the dollar store.  Weird right?  I actually bought about 20 cans of all different colors because it was such a steal!  Anyways, on to the reveal of the chair...


I love the little quatrefoil design on the back too...


and off to our booth it goes!

Wednesday

Ode to Walmart

I was amazed when I stumbled upon some great home decor selections at Walmart the other day.  I noticed they were making great strides in the decor area with their Better Homes and Gardens line, but hadn't paid much attention to it until I was shopping for a client recently. 

Check it out....


love a good animal print area rug....

or this fun rug, would be a great color scheme for a nursery...


two of these in a bedroom would be just perfect....


or this cute duvet available in brown or orange...

This blogger even turned it into some awesome curtains!


So there you have it, my ode to Walmart.  Keep up the good work Walmart! 

(I was not compensated in any way for this post, just stumbled upon some good deals and wanted to pass them along)


Tuesday

Client Design

Today I have a client before and after to share with you.  We updated this bachelor pad on a pretty tight budget with a lot of DIY.  

Here's what we started with...


We decided to keep the walls the same color to save a little cash and it worked well with the plan I had in mind....

So here are some after shots,  these were taken at night and I forgot the "good" camera but you can get the basic idea....

We added a little flair and glamour without getting too feminine by hanging this DIY starburst mirror above the bed, instructions here


The headboard was also a DIY project, I followed the same instructions I used here.

some goodwill frames got revamped for some inexpensive artwork....


I gave some clearance lamps a makeover and added a few more goodwill frames that had been painted to the top of the dresser....


You can still get a big impact with out spending a lot of money!


Saturday

Salted Caramel Cupcakes

It's time for a recipe.  This has nothing to do with design but I think you will thank me once you try these puppies.  Seriously, they are so easy to make and really delicious!

I found this recipe on joy's hope and she does an excellent job explaining it with step by step instructions and great pictures!  Here's her recipe (for more detailed instructions check out her post.  I modified the recipe a little bit for what I had on hand and have listed it below.

*One box chocolate cake mix and ingredients to make it (I used Devil's Food)
*Sea salt
*4-5 Heath bars
*Caramel ice cream topping (I used Hershey's, this was good but I may try to make my own next time)
*Buttercream Icing (this is the recipe I always use for buttercream (it's a little different than joy's) and I think it's the best, click here for the recipe.  I make one change and substitute more butter for the shortening, dee-licious!  I may try adding vanilla beans next time, because I love them, but they are expensive!)
*Squeeze bottle

Bake your cupcakes according to package directions.

When the cupcakes are almost done you will make the salty caramel goodness.

Pour caramel into a measuring cup.

Add 1/2 teaspoon of sea salt per 8oz. of caramel (I used a little more but I didn't measure exactly, I would just do it to taste-some may like it more salty or less salty)

Warm in the microwave for one minute.

Stir.


Pour the now warm and salted caramel in to a squeeze bottle.

As soon as the cupcakes come out of the oven,

inject caramel into each one.


Then move them on to a cooling rack.

While the cupcakes are cooling it is time to smash the Heath bars.

I used a hammer, and like joy, I think this was my favorite part.  It's therapeutic really.

No need to unwrap them, keep them in their packaging and start smashing.  This makes the cleanup much easier too.

Pour the crushed up heath bars into a bowl.  Then, after the cupcakes are cooled, frost them with the buttercream, roll them into the heath bars, then drizzle with more salted caramel.  I also used a decorative tip to pipe the icing on top, just makes it look a little more fancy.

I didn't get a chance to take any fancy pictures of mine once they were finished, but I sneaked a quick iphone picture at our Superbowl party before they were devoured.  Try these, you won't be disappointed I promise.


First 3 pics via joy's hope, last pic via yours truly


Thursday

DIY Nailhead Table Makeover

Two posts in one day?!?  I know. I just couldn't wait to show you this...

I know you probably thought this day would never come, and trust me, I wasn't sure it would either.  The table is finally finished!  After a LOT of work and a LOT Of hiccups, the finished product is here.  For a recap of the disaster, check out this post, appropriately titled "DIY Disaster."  Oh man, it was a doozie, but enough about all that. 

After a disaster with trying to refinish the table, I almost gave up.  The finish was terrible, uneven, and had deep groove marks where I tried my hardest to sand off the old finish.   So, I thought, maybe I'll just paint it, and you won't be able to tell. Well, I was wrong.  The gray paint seemed to highlight those unsightly grooves and the uneven finish like you wouldn't believe.  I was discouraged, but we needed a table, so I brought it back inside and tried to make it work.  Here's what it looked like after a little paint.  You really can't tell it from the picture, but just trust me, it was very noticeable in person.  


So, moving on...

I was so close to just putting this table by the side of the road and letting someone else worry with it, I wasn't even sure it was worthy of Craigslist, but I had a lightbulb moment while wandering around at Zgallerie (actually looking for another table)  I saw this table and realized it would be the perfect inspiration.


Here's the picture from Zgallerie's website...


I loved that the top was glass because that would mean I could eliminate the large areas that were damaged and only have to deal with getting the outer border smooth and even.  There was hope!  The idea of glass also appealed to me because that meant it would showcase my cowhide rug that was hidden by the wood before.  

I don't have a router (although that's on my birthday list) and didn't want to mess things up anymore, so I called our friend, who is a carpenter, and explained what I wanted to do.  

He cut three rectangles out of the top and created a lip wide enough for my nailheads.  We had three separate sections cut out so that we could still remove the leaf down the road if need be.  I actually like it better that way, too because it breaks it up and creates more areas for the bling of my nailheads.


I ordered nailhead trim from this eBay seller. It was the best price I found.  If you've never used this before, it's amazing!  You only nail every fifth nailhead, which makes it 1,000 times easier to get it straight.  I drilled a tiny pilot hole and used a nail punch to hammer them in.


Then, we ordered some glass from a local glass shop, and now we have a beautiful, functional dining room!  At last!


You've come a long way baby.....